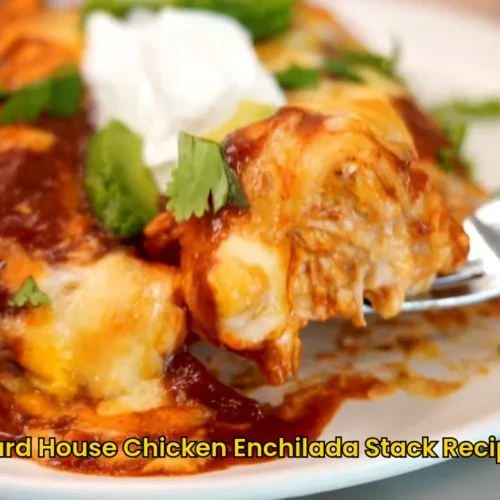
Yard House Chicken Enchilada Stack Recipe
Make this Yard House Chicken Enchilada Stack Recipe at home with seasoned shredded chicken, creamy vegetables, flour tortillas, red enchilada sauce, and plenty of melted cheese. Ready in about 1 hour, this easy chicken enchilada recipe has the rich, comforting flavor you expect from a popular Yard House restaurant dish without complicated steps. The creamy chicken filling makes every bite hearty and satisfying. Serve your enchilada stack with sour cream, avocado, cilantro, Mexican rice, or black beans for a complete meal.
Ingredients
- For the Chicken
- 2 pounds boneless skinless chicken breasts
- 1 teaspoon chili powder
- 1 teaspoon ground cumin
- 1 teaspoon salt
- For the Creamy Chicken Filling
- 1 tablespoon olive oil
- 1 medium yellow onion diced
- 1 medium bell pepper diced
- 1 small poblano pepper seeded and diced
- 1 medium tomato diced
- 1 can 10 ounces Rotel diced tomatoes and green chilies, drained slightly
- 8 ounces cream cheese softened
- 1/2 cup sour cream
- 1 cup shredded Mexican-blend cheese divided
- 1/2 teaspoon chili powder
- 1/2 teaspoon ground cumin
- 1/2 teaspoon salt
- 1/4 teaspoon black pepper
- For Assembly
- 8 large flour tortillas
- 2 tablespoons butter softened
- 1 cup refried beans optional
- 2 cups red enchilada sauce divided
- 1 1/2 cups shredded Mexican-blend cheese
- For Serving
- Sour cream
- Diced avocado
- Chopped fresh cilantro
Instructions
- Step 1 - Season the Chicken: Pat the chicken breasts dry and season both sides with the chili powder, cumin, and salt. Place the seasoned chicken in a small foil pouch, sealing the edges well so the chicken can steam inside. This keeps the chicken moist while it cooks.
- Step 2 - Cook the Chicken: Place the foil pouch on a baking sheet and cook in a 400°F oven for about 20 to 25 minutes, or until the chicken reaches 165°F in the thickest part. Remove the chicken from the pouch and let it cool enough to handle.
- Step 3 - Shred the Chicken: Once the chicken has cooled slightly, shred it into bite-size pieces using two forks. Set the shredded chicken aside while you prepare the creamy vegetable filling. Rotisserie chicken can also be used as a shortcut in place of the cooked chicken breasts.
- Step 4 - Sauté the Vegetables: Heat the olive oil in a large skillet over medium heat. Add the diced onion, bell pepper, and poblano pepper. Cook for about 5 to 7 minutes, stirring occasionally, until the vegetables soften. Add the diced tomato and cook for another 2 minutes.
- Step 5 - Season the Filling: Add the chili powder, cumin, salt, and black pepper to the vegetables. Stir well so the seasonings coat everything evenly. The vegetables form the main flavor base of the filling, so make sure they are well seasoned before adding the creamy ingredients.
- Step 6 - Make the Filling Creamy: Stir in the Rotel and softened cream cheese. Continue cooking and stirring until the cream cheese melts completely and the mixture becomes creamy and well combined. Lower the heat if needed to prevent the cream cheese from sticking.
- Step 7 - Add the Chicken and Cheese: Add the shredded chicken to the skillet and stir until it is evenly distributed throughout the creamy vegetable mixture. Stir in the sour cream and 1 cup of shredded cheese. Mix until the cheese melts into the filling and everything is creamy and combined. Taste and adjust the seasoning if needed.
- Step 8 - Toast the Tortillas: Lightly butter one side of each flour tortilla. Heat a clean skillet over medium heat and place each tortilla butter-side down. Toast for about 10 seconds on each side. You only want the tortillas lightly toasted so they become warm, flexible, and slightly richer in flavor without becoming crisp.
- Step 9 - Fill the Tortillas: Spread a thin layer of refried beans down the center of each tortilla, if using. Add a generous scoop of the creamy chicken filling on top of the beans. Keep the filling centered so the tortillas are easier to roll.
- Step 10 - Roll the Enchiladas: Fold the sides of each tortilla toward the center, then roll it tightly from one end to the other. Place each rolled enchilada seam-side down in a lightly greased 9-by-13-inch baking dish. Arrange the enchiladas close together so they stay rolled while baking.
- Step 11 - Add the Enchilada Sauce: Pour about 1 1/2 cups of the enchilada sauce evenly over the rolled tortillas, making sure the tops are well covered. Reserve about 1/2 cup of sauce if you want extra sauce for serving.
- Step 12 - Top with Cheese: Sprinkle the remaining 1 1/2 cups of shredded cheese evenly over the sauced enchiladas. Cover the tops generously so the cheese melts into a bubbly, gooey layer as the enchiladas bake.
- Step 13 - Bake the Enchiladas: Bake the enchiladas uncovered in a 375°F oven for about 20 to 25 minutes, until the sauce is bubbling around the edges and the cheese is completely melted. If the enchiladas were assembled ahead of time and refrigerated, cover the baking dish with foil and bake until heated through, then remove the foil and continue baking until the cheese is bubbly and melted.
- Step 14 - Add the Toppings and Serve: Let the enchiladas rest for a few minutes before serving. Top each serving with a spoonful of sour cream, diced avocado, and chopped fresh cilantro. Add extra enchilada sauce if you like them especially saucy.